Wednesday, June 23, 2010

Organizing Jewelry...

If you are anything like me, you have bought way too much jewelry...mainly because it's on sale or just so cute, and not very expensive. So now we've got more than we can see and it's all tangled in a drawer. I have this nice antique chest that I put jewelry in, but it still gets tangled and I can't see what I have, so I end up not wearing any...so what's the point of having it all, right? This is what I started with...a drawer full of tangled necklaces.


I am not one to just buy a jewelry box...no...I want something unusual or more decorative. I found this for my braclets. It's original purpose is for hand towels and sits on a bathroom countertop. I placed it on top of my antique chest and use it for braclets.

I then found this rack at Target for my necklaces. I really don't know what it's purpose is...I found it with the drawer pulls near the hardware section. It has 3 hooks to hang necklaces and I also have some hanging from the bar in between the hooks that goes all the way across.
So here is the finished set up. Necklaces on the hooks and bar...braclets on a bathroom countertop hand towel holder, rings in the box that I found at Ross last year, and some earrings on the pewter heart earring holder that was purchased last summer at Marshall's. I still have watches and some other things in the chest, but this is easy access and puts my jewelry where I can see everything and best of all...it's not tangled.
What easy organizing tips do you have to share?


Monday, June 21, 2010

Harvest time!!!

Tiana (7) and I had our first harvest in the garden today! We have been anxiously waiting for our cucumbers to turn that beautiful bright green and today seemed like a great day. She has been asking to pick the vegetables when they are ready, so off we went with scissors and basket. Here is her first pick. The first one is always so exciting. We were excited to see there are several more growing and will be ready in a few more days.


Here she is with 4 treasures in her basket...and the sun in her eyes.

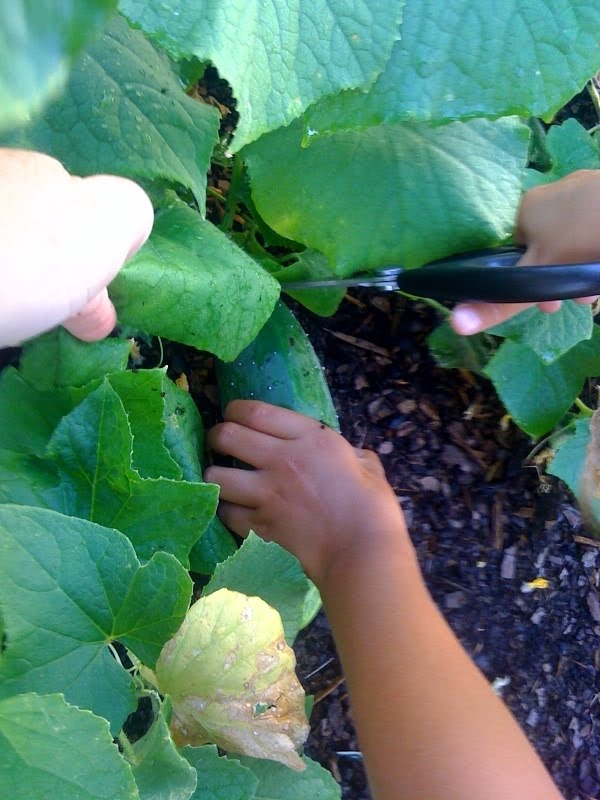
We washed... we peeled...we cut...we poured a small dish of ranch dressing. She wanted her very own cucumber to eat and wanted it all to herself. They are so good!!! There is nothing like the taste of a very fresh picked vegetable. It's amazing how much difference there is in the taste of fresh picked 5 minutes ago and the one you just bought at the grocery store. She loves them! I wasn't sure what she would think, but she really liked it and her friend even came over to try it...she liked it, too. Makes a momma's heart proud.


And what do you do with the left over scraps and peelings? Back to the compost bin...Nothing wasted.

Now...what did we do with the other 3 cucumbers? A couple of them were growing fat and not greening up like they should. We decided to go ahead and pick them so they will not continue to suck energy from the healthy ones. They are still good, just a little bland and not quite as sweet. One is sliced and marinating in balsamic vinegar. A few slices are in a pitcher of water...if you have never had cucumbers in water, try it! Soooo good. I had it for the first time at a spa and wasn't sure what to think, but it's very refreshing. The last one is another fat, but not quite green one that the girls decided we would cool and use for our eyes. Can you believe my 14 and 7 year old girls even thought of that...must be homeschool! LOL Guess what we'll do with the last one...yes, it is cooling for use on our eyes later tonight...while we sip on our cucumber water.


What do you like to do with cucumbers?
This post brought to you by a vintage Crazy Daisy mixing bowl and my favorite green, heels.


Friday, June 11, 2010

Grinding Wheat and Baking Bread

I've been talking about my bread baking on Facebook for a long time, so I finally decided to blog about it. This post will be just about the process and recipe. I will post another time about the benefits of doing bread this way. The main difference is that I grind my own wheat, instead of using store bought flour. It's much healthier because the whole grain kernal is natural and intact. I buy in 6 gallon buckets. I use hard white wheat (in the bucket on the left) and hard red wheat (in the bucket on the right). I mix the two wheats together and that is what you see in the third smaller bucket. This is my wheat grinder. This one is the Whisper Mill...I don't know why it's called the 'whisper' mill...it's so loud. I think they actually changed the name of this mill to the 'wonder mill'. It's electric so all I do is fill up the top of the grinder with wheat and let it do all the work. The kernals are ground and it comes out in the bucket to the right as flour. At this point, you can use the flour to make waffles, pancakes, bread, pizza dough... just about anything that you would use regular flour for.
One thing I love about making my own bread is that I know exactly what ingredients are going into my food...and I can spell and pronounce all of them. This bread recipe has only 6 ingredients: 5 cups of water, 1 1/4 cups oil, 3/4 cups honey, 3 Tbsp instant yeast, 12-13 cups freshly ground flour and 5 tsp of salt. (this recipe makes 5 loaves of bread, but if you don't have a big mixer you can cut the recipe in half.)
I pour all of the wet ingredients into my mixer, then add the yeast and salt and finally start to add the flour as the mixer starts to mix. I love my mixer as between the grinder and mixer it does all the hard work of making bread. Mine even has a timer, so after all the ingredients are in the mixer, I set the timer for 10 minutes. Then I take out the scraper and dough hook and cover the bowl with a wet cloth to let the dough rise until it fills the mixing bowl...usually double in size. This is what it looks like after it has risen. I usually let it rise a bit more, but this time I didn't... my family was hungry!
At this point I pull the dough out of the mixing bowl and onto the counter that I have sprayed with oil. I divide the dough into 5 equal sections and form into a nice oblong shape, then place into a bread pan that has been sprayed with oil. I set on the stove top and cover with the wet towel and let it rise again until it fills the bread pan. I usually go ahead and turn the oven on to preheat and this heat also helps the dough rise faster. With this dough recipe I usually make 3 loaves of bread and use the rest of the dough to make other things. I roll out pizza crust (some large and some individual size) that I wrap in wax paper and plastic wrap and it goes straight into the freezer. When we need a quick lunch or dinner, we just pull out pizza crust, spread on spagetti sauce and top with our favorite toppings then bake for 10-12 minutes. I also make rolls. I take a muffin pan, roll small balls of dough, placing 3 balls in each muffin space. I freeze them in the pan. After they are frozen, I take out and place into a freezer bag. When I want rolls for dinner, I take them out in the morning placing each roll back into the muffin pan and set on the counter to thaw and rise during the day. When it's dinner time, I bake for 8-10 minutes.
Finally cinnamon rolls! This is my family's favorite and I always have these ready in the freezer. I roll out the dough into a rectangle shape. Coat the dough with butter, sprinkle heavily with cinnamon, then sugar (we use Splenda), more cinnamon and more Splenda...sometimes I use Sugar in the Raw. Roll into a log shape and cut into 1" sections. Place about an inch apart in freezer and baking safe pie plates or baking dishes and cover. They are ready to go in the freezer. When you are ready for cinnamon rolls for breakfast, pull a batch out of the freezer and set on the kitchen counter the night before (at bedtime). They will thaw and rise and when you wake up, just bake them on 350 for 15-18 minutes. This pic is a batch ready to go into the freezer.
Here is the bread after it comes out of the oven...So beautiful, healthy and you just can't beat the smell of fresh baked bread as it fills up the house.
I hope you enjoy this post and recipe. Can't wait to tell you all about the benefits of grinding your own wheat...you'll never eat store bought bread products again!
This post brought to you by brown wedge shoes that I like to wear to the pool. lol


Thursday, May 13, 2010

Coupon, coupons and more coupons!

Yes, I am a coupon clipper. It drives me crazy to pay full price for anything! When I need something (other than food), I will first check my local freecycle group. My next step is to check Craigslist and finally I will look for a coupon. There are so many sources for online coupons, and even on Facebook there are groups like FreeSnatcher that alert you to free samples and other deals. Just this month, I received a free beach towel (from a trivia contest on Facebook), a shampoo sample, a laundry sample, a free bag of pretzel M&M's and I have more freebies on the way, including a full size Suave Shampoo.

But back to coupons! I am an organizational freak! And there are so many way to organize your coupons. I started with a small file box and index card tab dividers. I have to say, at first it worked fine, but now I'm finding it a bit of a hassle...it's just hard to see what I have, and it's hard to pull them all out in the middle of the grocery store with kids telling me to look at this and 'can I have that'. I have seen women using 3 ring binders with clear pages to organize and since I am a lover of 3 ring binders (I use them to organize everything that is paper) I think I like this method. I found this website... http://http://moneysavingmom.com/2010/05/31-days-to-a-better-grocery-budget-finding-a-coupon-organizational-system-which-works-for-you.html through a fellow homeschool mom and I love it!!! Great tips and other organizational info, including videos on how to use coupon organizers and choosing the method that works for you. Take a look and let me know which way works best for you.

I think I'm going on over to my freecycle group now to look for baseball cards pages to fit in my 3 ring binder...lol

Happy savings!

Wednesday, May 12, 2010

Compost Cookies

OK...so last time I posted about starting a compost container in your garden... Now I have a different kind of compost recipe for you to try...this one is compost to eat! Yes, I said eat! Don't turn me off yet...it's actually really good and fun to make, especially with children.

I saw this one morning on tv and just had to try it. How many times do you have a bit of this (nuts, crackers, potato chips) and that (candy, cereal) but not enough to actually use for anything? Now you can put all those extra little ingredients into a "Compost Cookie"...not wasting anything. I found the recipe on the MomoFuku Milk Bar website... MomoFuku is a little bakery in the East Village in New York City. I've never been there, but have heard about it...looks like a cool place.

I made a big batch of the basic cookie recipe, then divided the batter into 4 bowls...1 for myself and 1 for each of my 3 girls. That way we could each add what we wanted to make our own custom cookies.

The basic recipe is:
1 Cup Butter
1 Cup Sugar ( I use Splenda)
3/4 Cup Brown Sugar ( I use a Splenda blend)
1 Tbsp Corn Syrup
Mix above ingredients in mixing bowl until creamy. Then add vanilla and eggs.
1 tsp Vanilla ( I make my own)
2 large eggs
Continue to beat about 10 minutes on medium speed.
Then add the last 4 ingredients below and beat at low for 1 minute.
1 3/4 Cups Flour (of course I grind my own soft white wheat grain)
2 tsp Baking Powder
1 tsp Baking Soda
2 tsp Salt

Now you are ready for fun!!! Add 1 1/2 Cups of 'this' and 'that'. If you want to divided your batter to make different kinds of cookies, you will also need to divide the 1 1/2 Cups of extras accordingly. After you mix in your extra goodies, cover your bowl with plastic wrap and chill in the fridge for at least 1 hour. You can also roll into a log and have slice and bake cookies ready to bake anytime you want them. This will keep in the refridgerator for up to 1 week. When ready to bake, scoop into balls on cookie sheet and bake at 400 for 9-11 minutes.

In my cookie I added: Peanut Butter, coconut flakes, crushed pretzels, mixed nuts, dried cranberries, grated white chocolate and butterscotch chips. My girls used M&Ms, chopped candy bars, Goldfish crackers, and chocolate chips and cereal.

I've been told you can add just about anything...that's why it's called a compost cookie...you just dump in whatever you have on hand. And...they are very tasty! What will you put in your compost cookie?


Want to try another crazy good recipe from MomoFuku? How about "Crack Pie" ?!


Thursday, May 6, 2010

Don't waste a thing...

It drives me crazy to waste things. I love to recycle and will find a way to recycle just about anything. There are charities that take almost anything...cell phones, clothes, printer cartridges...even cars. But what about the kitchen? I have learned to take left overs and create a new dish...left over broccoli & cheese soup turns into broccoli and chicken casserole. Roast and potatoes turns into a stew over cornbread. But what about all those beautiful fruit and vegetable scraps that you cut off and can't use? Sometimes I save those for making chicken stock...onion, celery and carrot scraps are great to throw in a pot with a chicken carcas for stock. I freeze the stock and use it for soups later.

You can also use the scraps for composting. When we lived on a farm in the early 90's, I had a garden and compost bin. Haven't had one in about 10 years and I really miss the feeling of growing our own food and soil. After hearing about all my friends planting gardens this year, I decided to go ahead and do it again...and when I do a garden, I do a compost bin as well. To me they go hand in hand. I will share with you both of these projects, but let's start with the compost bin.

I am sure I'm not alone when I say money is tight right now. I just don't have the money for a $100 compost bin. But there are ways to do this with very little to no money. You can make a wooden frame to hold a trash can that you lay on its side so it can rotate...that was too much work for me...so I decided to use an old rubbermade storage bin that I already had around the house. Just drill a few air holes in the lid and around the top of the bin itself...then your ready to add compost ingredients...it's that easy!

Coffee grinds (including the filter), tea bags, fruit and vegetable scraps, saw dust, grass clippings, leaves, dirt, junk mail, etc. Just about anything that is biodegradable can go into your compost bin. You can buy a mini compost can to keep on your kitchen counter for holding your scraps until your ready to add to your larger bin outside, but those are around $50. I just keep a mixing bowl on my kitchen counter by the sink so it's handy when I'm chopping and cooking. I just throw the scraps in the bowl and at the end of the day...or the next day...I take it and dump into the compost bin outside.
When starting your compost bin, it's always good to start with a layer of shredded newspaper or junk mail...I know...finally a good use for that unwanted mail that comes every day.
SSo... a layer of shredded paper, then dump in your kitchen scraps. Now, I know you're thinking...'dump'? Not an attractive word...but since we are talking about compost we'll use this word. However, when we're talking about cooking, I'll use a more lady like word. I did throw some leftover potting soil on top of the newspaper and kitchen scraps. Then comes the magic of composting...the worms! You don't have to use worms, but it does speed up the process. We found a really quaint, little, ole hardward store not far from us that was like stepping back in time...and they sell composting worms...you want 'red worms'. They also sell ladybugs and praying mantis eggs, but we'll save that for another post.
My sweet baby girl (7 years old) loves to dig in the dirt, catch lizards and carry around 'holy polies' (her name for rolly pollies) helped with the worms, but she really didn't care for them as much as some of her other little critter friends. She did let me take this picture before dumping them in the bin.

So...shredded paper, kitchen scraps, a little potting soil and worms...now pour some water over the top to moisten everything and put the lid on tightly...that's it! The only thing to do now is mix it up every few days, keep it moist and keep adding ingredients. In a few weeks or months we'll have great fertilizer to add to the soil in the garden. Not sure how long it will take to compost, but I'll post progress as well go. Let me just add this disclaimer: I am not an expert on composting or gardening! Just a mom that loves to do things inexpensively and be wise with resources. Feel free to add comments teaching me more on any subject that I post here.


Monday, May 3, 2010

Homemade Laundry Detergent...

OK, so for a long time I've heard about making homemade laundry detergent. I never tried it because I thought it would be a difficult process. Well, let me tell you...it's not! It's super easy!!!

With the economy the way it is right now, I've been trying to stretch our dollars to the max. I was so excited to find this recipe and I can't believe how much money it will save us. Check this out...
$1.49 Fels-Naptha Bar Soap
3.79 Arm & Hammer Washing Soda
$3.49 Borax Powder
$3.47 5 Gallon Bucket
Total for all supplies...$12.24
My normal store brand detergent cost that much and I buy it about every 6-8 weeks.
I figure this homemade version will save us approx. $100-$150 a year! Isn't that amazing?! And...I still have supplies left over for several more batches of detergent. It very well could only cost me less than $15 for several years worth of laundry soap. If I could only find a way to make homemade toilet paper and paper towels!!! That stuff is outrageously expensive!

Here is the link to the Duggar Family's Website...this is where I found the recipe...
We've also tried their tatortot casserole recipe...YUMMY!
What dollar stretching things do you do? Let's share ideas and help each other out.